Wednesday, July 27, 2011

~it's days like this~

Woah, thought I'd given up on the blogging thing for a while there, I did.  But, I decided to stick it out, see what I could make of it. But anyways.... it's days like this that I seriously wish I was rich. Like, so rich I can just go out and buy whatever I want to. I'd  spend like 98% of my fortune on clothes that I would only ever wear a handful of times. But that would be okay, since I'd be rich! It wouldn't matter that one dress cost as much as I make in a week at my measly babysitting job... oh, if only, if only.

I'm done ranting now. The rant continues in my head, but I've decided to keep it short, sweet, and simple here. Seriously though, someone needs to take my laptop away, that way I'll stop spending so much time drooling over clothes that are ever out of my tightwad hands. Oh, and it would also help if Lifetime would quit with the Project Runway marathons.... it's hard not to feel crappy about what you're wearing when you see what Heidi's in...

If someone out there is uber-rich, and would like to fund my teenage-money-grubbing habits, it'd be much appreciated,
D.

Wednesday, July 13, 2011

~trying new things is important, right?~

In the spirit of change, I'm trying something new. As you'll read below (hopefully!), I can't have a fashion blog like all the ones that I read. There's no special someone in my life that I can spend an hour with each morning, taking dozens upon dozens of pictures of me smiling and looking cute. It's just not logical, unfortunately. But, I decided that I can kind of, sort of draw --- and that I should use that to my advantage. So, I decided to sketch/draw my outfit pics. I'm sure it's been done somewhere, and I'm sure their's is better, but my options are rather limited.

Here it is though, my first outfit pic. I'm excited personally, and I'll love some encouraging thoughts from my "readers". Or, I'd even appreciate some not-so-encouraging thoughts, I suppose.

On a side note, I just noticed the date that I put in the corner as soon as I finished sketching it. That's kind of embarrassing.... it's the seventh month of the year, y'all, not the sixth. So the date that I wore this outfit was actually 7.12.11. Oh, and sorry about the fact that the first couple of letters on each line are cut off: it turns out that I'm not the best of scanners. My B.

In an apologetic mood apparently,
D.


Monday, July 11, 2011

~diy: easiest skirt ever.~

From this...


To this!

You guys, this is seriously the easiest skirt. Ever. If you don't believe me, just try it. I mean, this was the second thing I ever sewed, and it turned out way better than I ever dreamed it would. I'm trying not to write as much in my posts from now on, but... I'm a rambler, so we'll have to see how it goes.

But, I'm going to try. For the second time: this is the easiest skirt ever. If I can do it and produce something actually wearable, you know it's easy. I've already made two more just like it, and I have the fabric to make several more (in fantastically bright colors this time).  Oh, and this tutorial is basically this post from the fabulous blog What Would a Nerd Wear, just simpler since there are no pockets. So here we go:

You need:
- about 1.5 yards of the fabric of your choice
- measuring tape
- pins (or a marker/pencil/tailor's chalk)
- sewing machine (or needle & thread)
- elastic waistband
- safety pin

Note: Make sure that your thread matches your fabric, or else it'll look kind of funny at the hems and such.

First things first, measure your waist, and then subtract a few inches from the length. For example, I'm a little on the mhm side, so my waist is 35 inches and the waist measurement of my skirt will be 31 inches. Then decide how long you want your skirt to be: I wanted an 18 inch skirt. Once you decide, add on 3 or 4 inches to the number to account for hemming and the elastic loop. So, my skirt length was 21 inches, meaning that my skirt pieces were 31 inches by 21 inches. Oh, and make sure you've washed and dried your fabric to ensure that it won't shrink in the drier after you've made it (no slutty skirts please, y'all).

Cut two pieces of fabric (as big as your measurements!) out. I didn't have any pins when I made this skirt, so I just drew on the wrong side (the side that will be facing towards my legs) with a ballpoint pen, just because it was all I had.


Lay your two pieces of fabric, one on top of the other. Make sure the right sides of the pieces are facing each other, like so:

 
Sorry about the fact that it's kind of hard to tell the difference between the two sides, my fabric was the cheapest I could find -- I didn't want to use expensive fabric to try this skirt for the first time -- and I also decided to make this skirt at night, starting somewhere around 10 o'clock. My camera's not the best, and the lighting in my room is rather... sucky.
 
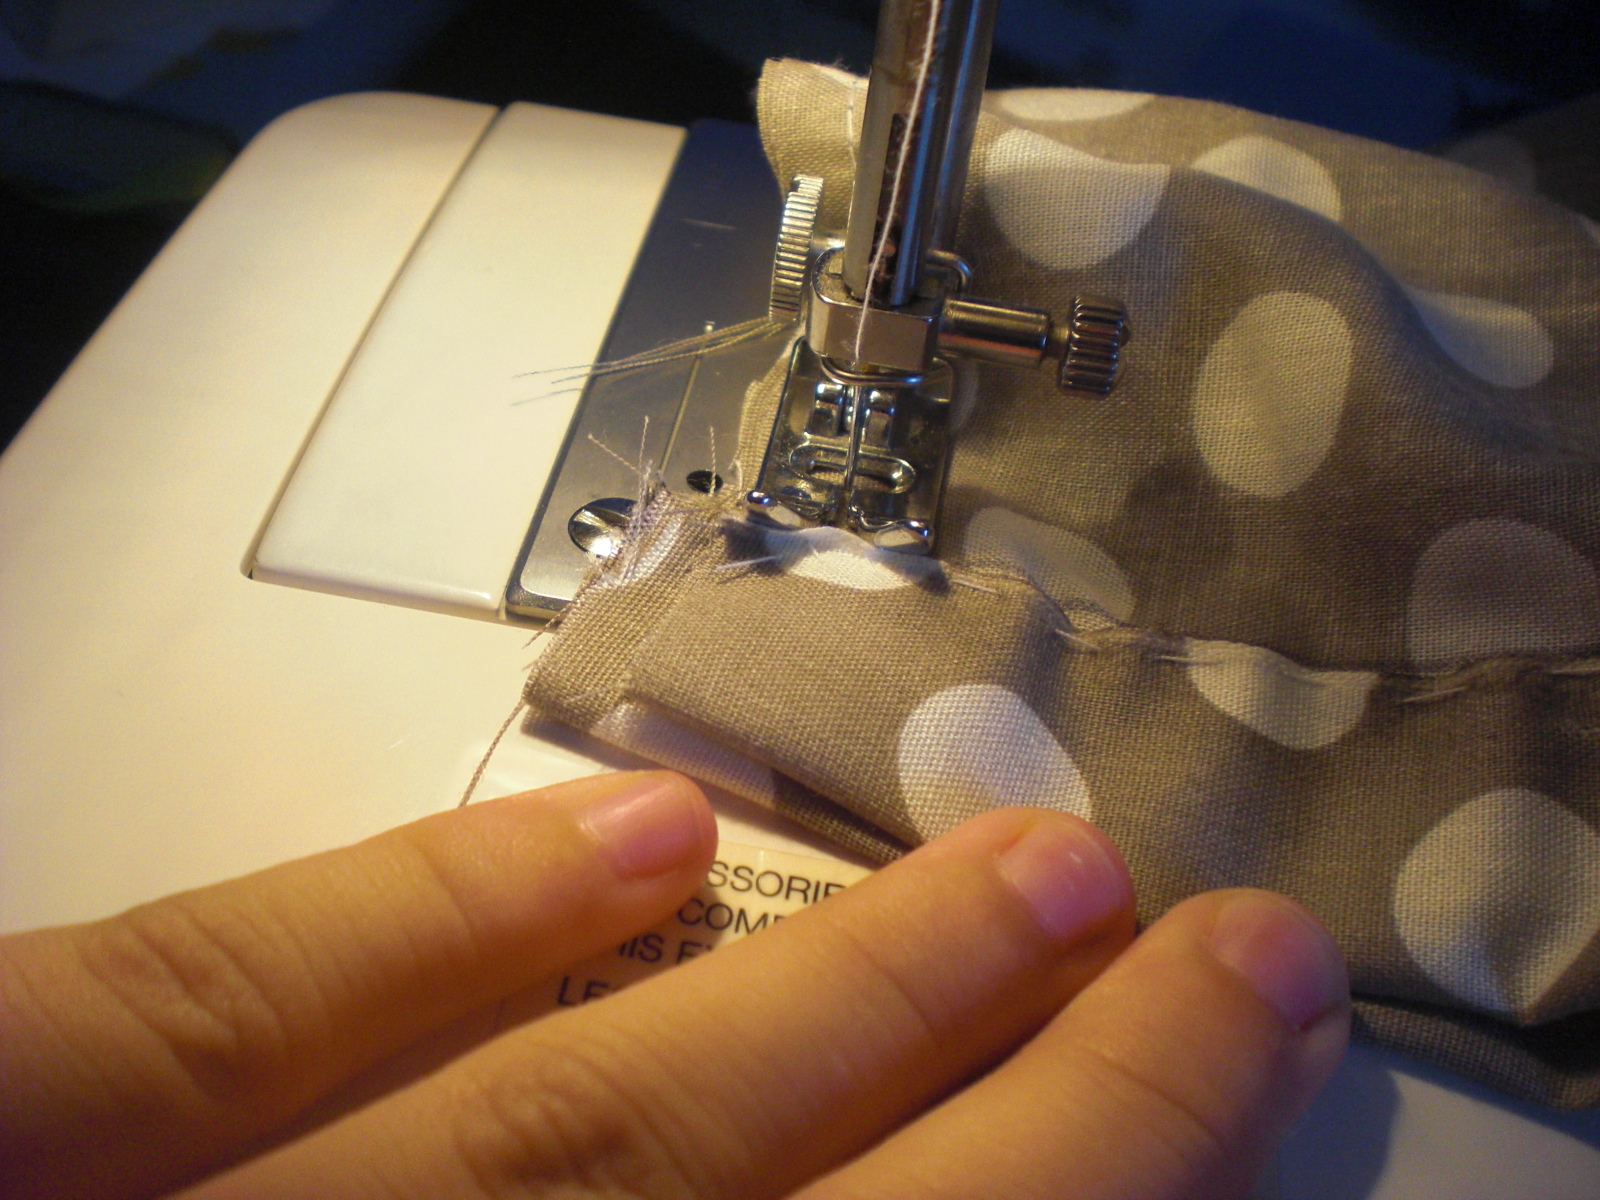
Anyways, pin one of the sides of the skirt pieces together (not the long ends, but one of the short ends) and sew away, about a half-inch from the edge.


After you sew the edges, lay your two pieces (which now make one long piece) flat, right side down. Fold the bottom side up just a tad to make your hem, them iron it in place. Using your machine -- or hand, if you're like me and not completely comfortable with a machine yet-- carefully sew down your hem, trying your best to keep it going in a straight line, which is easier said than done. 


It's hard to see, but my rather-sloppily-sewn hem is up there in the picture above. The next step is to measure your elastic. For the length, you want it to be the same length as one of your waist measurements for the pieces (so mine, again, was 31 inches). Then measure the width of your band of elastic. The width of mine was around 1.5 inches. Lay the elastic along the top of the skirt, and fold the very top over the band. Because of the width of my elastic, I measured out 3 inches from the top and drew a line with my pen for easy reference (again, no pins). Folding it over to the line, you should be making a nice little loop for your elastic. Then, carefully sew it down.


Once you do that, lay the pieces together again, right sides facing each other. Starting at the bottom, sew your way up the side. MAKE SURE YOU STOP RIGHT BEFORE THE LOOP FOR YOUR ELASTIC BEGINS. I REPEAT: MAKE SURE YOU STOP SEWING BEFORE THE LOWER END OF YOUR LOOP! Otherwise, you won't be able to put your elastic in, and then you'll have a pillowcase-esque sack that somewhat resembles a skirt.


Now stick your safety pin through one end of the elastic's loop. Then carefully begin to push the elastic into the loop. Once the entire length of the elastic was in the loop, I pinned the end of the elastic to the edge of the loop, that way it wouldn't get lost in the loop. Then, carefully push the loop onto the elastic. In order to get all of the material onto the elastic, it will start to pleat a little bit. Don't worry, it's supposed to, and it'll turn out great. You're in the home-stretch of the project now, and messing it up is kind of hard to do at this point. Once you get the elastic stuck through the loop, carefully sew down the ends of the elastic in the loop. Looking at the picture above, you can do the same thing once the elastic is through. Just continue your seam from earlier straight to the edge.

And voila! You're done!

I've still got a couple of DIYs and restyles that I've yet to write, but I'm going to try to get them up soon, promise. Until then though,

D.

Friday, July 8, 2011

~very first diy~

Woah, has this been a crazy week, or what? Monday, the Fourth, was actually the calmest day of the week for me. For the first time (possibly ever), my family did absolutely nothing to celebrate. No going to the town celebration at a huge park, no cookouts with friends (there used to be a time when we would have a cookout almost every Saturday night during the summers, but not so much anymore). Instead, we all just vegged around the house, my brother and father playing World of Warcraft and Call of Duty (dorks, right?), my mom catching up on way-old seasons of Lost, and me hiding away in my room, compulsively reading blogs and trying to think of ways I could make things with my nonexistent budget. On Tuesday I went fabric shopping with my grandmother, spent way too much money, and bought enough fabric to make at least five skirts with leftovers. Wednesday and Thursday, I was stuck babysitting the three-year-old demon child from hell. Upon my return home on Thursday afternoon, I promptly apologized to my parents for putting them through that for years when I was the little one's age. Then today, I had to clean house for friends to come over tomorrow (all-day Lord of the Rings marathon, here we come). And, my dad actually asked me to hem a couple of pairs of work pants of his! He trusted me, after not even a week of knowing how to sew, to hem two (!) pairs of khakis that cost way more than anything I should even be trying to touch with a needle. With shaking hands (I did NOT want to screw this up), I tried my best to hem them, and when he got home, he said they looked good! I can't think of the last time I felt so proud, honestly.

But enough rambling. I've noticed from other blogs that I write WAY more than pretty much every other blogger does. Maybe that's why they have followers....

Anyways, for my very first DIY, I decided to post.... how to make a hex nut bracelet. I've seen pictures of these everywhere, and they seemed right up my alley. I know how to braid (thank goodness), and my dad has tons of hardware doojamahickies. So, while he was at work, I raided his cabinet, found the hex nuts and promptly made my bracelet. But, as I was making it, I was struck with the wonder of what it would look like painted. So, I made both. Oh, and before I get started, I have to give the credit for this to the blog Honestly...WTF here. Mine's my own version, but still. I give credit where it's due.

My version: freeee

Designer version: more money than I make in an entire summer
I realize that the colors on mine make it seem more childlike, but considering I'm still in high school, I'm thinking that it's okay. I do, however, have one in plain silver (with unpainted nuts). Like it? Here's how to do it:

You need: hex nuts (I used twenty), three pieces of evenly cut twine, some paint (I used acrylic stuff I we had lying around from some art project), a paintbrush, water, and a surface you can get paint on (I used newspaper on my bedroom floor, since I started doing this project at some ungodly hour after filching the nuts hours before). Here's the supplies I used. Oh, and fair warning: this is going to mix between a colored one and a non-colored one, so don't get confused.


First things first, I used a safety pin to make sure the braid stayed taut. Take your three pieces of twine, tie them in a not, then braid them regularly.


When you want to start braiding in the nuts, place the first nut on the braid on the side that needs to be folded over. Push it all the way up, and then pull it towards the middle.


Then do the same to the strand on the other side, whose turn it is to be crossed...


Then keep on doing it until all twenty (or however many you're using) nuts are braided into it! Once all of them are braided in, continue braiding without them. When the chain is long enough, tie a knot, and presto! You've got yourself a sweet-looking designer knockoff.


Sorry I don't have more pictures of the colored bracelet, but if you want to do it, just make sure that you paint the each of the nuts entirely before you start to braid. Because of how thin my twine is, I can basically see all of the nut, even when it's braided in, so make sure you get the whole thing, and make sure you give it ample time to dry (I waited all night).

That's all for now folks,
D.


Monday, July 4, 2011

~my new favorite thing in the world~

Breaking news, guys: I have a sewing machine!

Well, it's not officially mine.... it was my mom's, then my grandmother's, and now it's mine, sort of. I mean, it's sitting on my desk now, and chances are that neither of them are going to use it again, which is great for me. The thing is, it's kind of old. I'm actually convinced that it's older than me. That puts it somewhere around the age of sixteen. So yeah, it's old, and its kind of beat up, but I can't help but love it. Let's see, today's Monday, and I got it on Saturday... so for the last two days, I've been a sewing fiend! I also discovered that the packrat tendencies I've had all my life are actually a good thing when it comes to sewing and DIYing (I'm not sure that's a word, but...) On Saturday, I attempted to make a shirt (it was a lot of hard work, and it doesn't look too bad for my first time, but it will not get worn very often, if at all...). Saturday night, after finishing the "shirt", I restyled a men's button-down shirt into a halter top (keep an eye out for my tutorial, coming soon). Then, on Sunday, I made my very first skirt! And, even better, it was wearable, and it looked good! I don't think I've ever been so proud of myself, honestly. The tutorial for the skirt is also coming... eventually. Finally, on Sunday night, I turned a pair of my old flare jeans into my very first pair of skinny jeans. Exciting, huh? So I've got four or five tutorials heading your way... I just get too excited and forget to take pictures at each step.

Until next time,
D.

PS: Oh, and here's a picture of my new baby.. he's an oldie but a goodie!(:


Friday, July 1, 2011

~restyle #1: keychain to necklace~

Welcome to my very first restyle! The only reason that I joined the blogosphere was because of the fabulous fashion ideas that I found on DIY blogs that I've taken up reading. Though this isn't the first DIY that I've made, it is my very first posting, and I can't say how excited I am(:

All of us have a friend who sets the trends, the one who jetsets around the world. Lucky me, I have more than one (I can't put my jealousy into words). I have a friend, L, who's father is German, and they head off to his homeland at least once a year, often for an entire month during each summer. It's become routine for her, and for me to miss her for the entire month. I also have another friend, K, (check out her blog here! warning: she's a fledgling blogger like me) whose parents take her on equally fabulous trips, though they don't last a month (seriously, who vacations for a month at a time?). Since K's mother is a flight attendant, they get crazy good deals on flights, I think. Anyways, K and her parents went to Paris for spring break last year (our sophomore year). Crazy, right? While the rest of us were making day trips to the local beaches, she was off rubbing shoulder with crazy, beautiful Parisans in the city of lights. Sorry, I'm rambling, but... Anyways, since I knew I wasn't going with her, I was happy for her, but secretly (maybe not so secretly) hoping that I was going to get some time of souvenir from France. And, thankfully, K didn't disappoint. Upon her return to Middle of Nowhere, USA, I was presented with a postcard of Paris that did nothing but strenghten my desire to visit AND a keychain filled with four charms. There was a charm that said Paris (stating the obvious), one in the shape of a clover that repeated Paris again and again, one representing the Eiffel Tower, and my personal favorite: one of the Arc de Triomphe (see the photos below). So I had this keychain with charms that I absolutely adored, but truth be told, I'm not much of a keychain person. So, I wanted to find a way to use the keychain since I both appreciated the thought and I wanted the charms. Months later, after perusing DIY blogs for several days, I came up with the thought of making it into a necklace. This restyle is pretty simple to do, so my instructions are going to be brief and you should be able to figure out how to do it fairly easy.


Here are the charms puleld off of the keychain. Such an easy step one, right? After that, I looked through my mom's old jewelry-making stash, hoping to find something to use as a chain. My search produced a plain back cordy material that was already set up to be a necklace. I'm guessing that it was an old necklace from my childhood with the pendant missing, which was just fine with me.


Sorry the pictures are kind of blurry, but my camera's not the best. Anyways, I threaded the charms onto the chain, and voila! All done. Or, so I thought. As soon as I finished the necklace, out I went with K (ironic, right?). We were scheduled for a tour of the local university (we're overachievers like that), and I just barely finished before she picked me up. She said she liked the necklace, which was important to me, considering she gave it to me. Then, when we were checking into the tour, the student checking us in complimented the necklace. It was a very, very proud moment for me, considering it was the first thing that I've actually made. Pretty sweet, huh? Anyways, while we were doing the tour, it broke! I repeat: the new necklace that I loved so much broke, just hours after it's "creation". Dejected, and disappointed in my apparently nonexistent crafting skills, I stuck it in my pocket for after the tour. Once I got home, I tried my best to find a new way to put it on a chain. But, all I could think to do was thread the charms onto a braid, similar to the Braided Hex Nut bracelets that have been kicking around on blogs like Honestly...WTF (spoiler alert to my first DIY, guys). So, that's what I did. Surprisingly, I like it better now! Simpler things like friendship bracelets and things made out of hemp are more my speed anyways. But instruction wise, this is super easy. Just start a braid, get it going, and then loop the charms on eventually. Continue the braid, and bam! You're done, just like that. If that doesn't make sense, then keep an eye out for my first DIY, coming soon. I promise, there'll be more instructions in that one!

Here's the finished product, which I happen to love:


Ever since I got the hemp to make the hex nut bracelet, I've been obsessed with making jewelry from it. So that's all for now, but I am sorry that this was such a long post, dear imaginary reader. It wasn't supposed to be, but I have a bad habit of rambling, as you'll soon learn.

Enjoy!
D.

Thursday, June 30, 2011

~etiquette warning~

Okay, so I'm definitely new to the blogging scene, but there's a lot of blogs that I love and would really like to link to. I don't know any of the people (I'm definitely guilty of cyberstalking, and I'm proud to admit it), but I want to give them credit for the DIY projects that they came up with. Since I'm new, I'm not really sure what to do. I definitely don't know blogging etiquette, but I'm going to try. For those of you who I'm crediting, I hope you don't mind if I link my never-going-to-be-read blog to you. If you do, let me know somehow, and I'll fix the problem, I promise. Actually, on second thought, I think I'll just write the name of the blog, and then, if I learn that I'm doing something wrong, I'll go back and link it. I am, however, all about giving credit where it's due.
Anxiously wondering what's right,
D.